WordPress plugins make it possible to extend website functionality without modifying the WordPress core. Developers can create plugins for contact forms, image sliders, payment processing, customer management, analytics, product synchronization, social media integration, and many other purposes.
However, some plugin features require information or services that are not available directly within WordPress. For example, a weather plugin may need live weather information from an external provider, while an eCommerce plugin might need to retrieve product information from a supplier’s system.
This is where third-party REST API integration becomes useful.
A REST API allows different applications and services to communicate over the internet using standard HTTP requests. By connecting a WordPress plugin to an external REST API, developers can retrieve information, submit data, synchronize records, and communicate with external platforms.
Although API integration provides significant possibilities, implementing it correctly requires knowledge of PHP, HTTP requests, authentication, JSON processing, error handling, and WordPress development standards.
In this comprehensive guide, you will learn how to connect a WordPress plugin to a third-party REST API, configure authentication, send HTTP requests, process API responses, protect sensitive credentials, and troubleshoot common integration problems.
1. What Is a Third-Party REST API?
A third-party REST API is an interface provided by an external application or service that allows other software to access its functionality or information.
REST stands for Representational State Transfer. It is an architectural style commonly used to develop web services that communicate through HTTP.
For example, imagine that you are developing a WordPress plugin that displays current weather information on a website.
Instead of collecting weather information yourself, your plugin can communicate with an external weather service.
The external service receives a request, processes it, and returns information in a structured format, usually JSON.
Your WordPress plugin then processes that information and displays it to website visitors.
Other examples of third-party REST API integrations include:
- Payment gateway integrations.
- Google Maps and location services.
- Weather information providers.
- Social media platforms.
- Email marketing services.
- Customer relationship management systems.
- Inventory management platforms.
- Shipping and delivery services.
- Artificial intelligence services.
- External product databases.
The REST API architectural principles provide useful background for understanding how these services communicate.
2. Understand How REST API Integration Works in WordPress
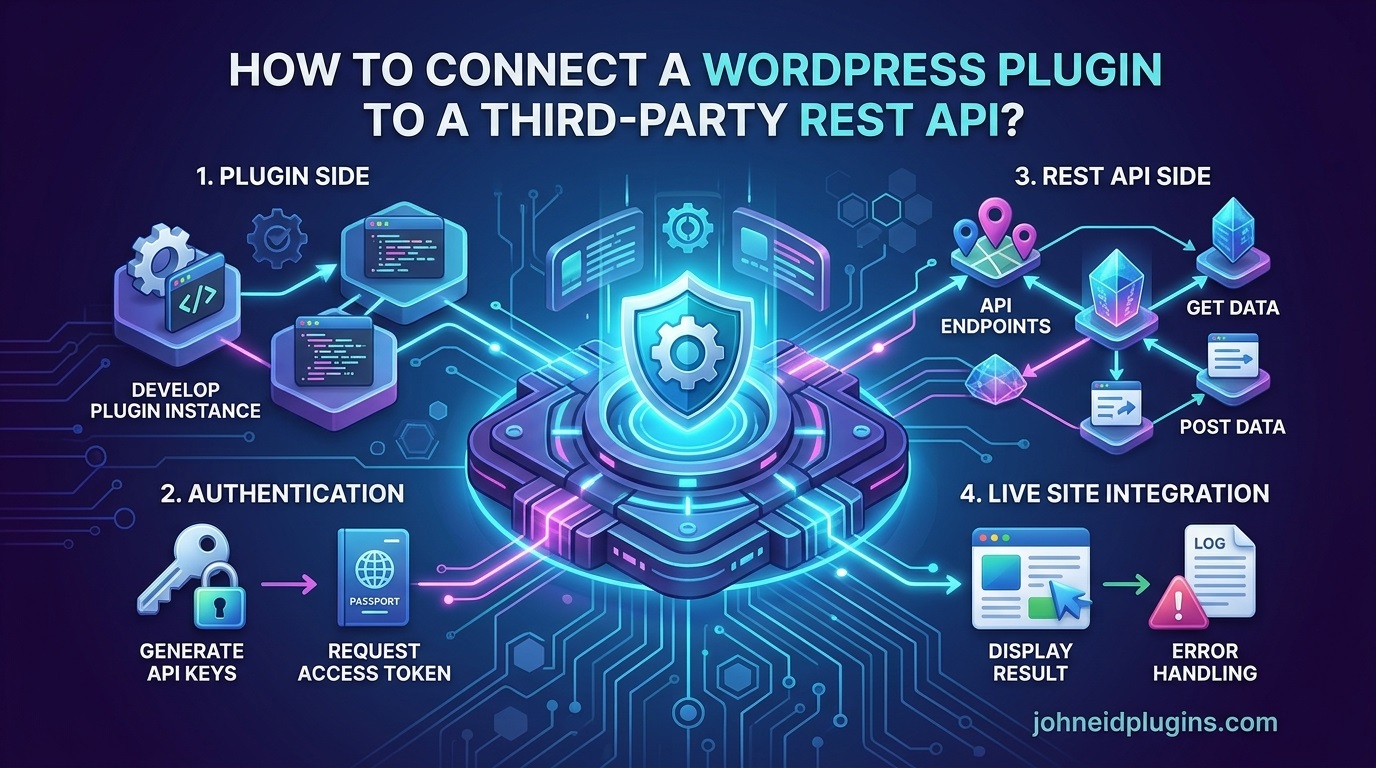
Before writing code, it is important to understand the communication process between a WordPress plugin and an external API.
A typical integration involves several steps.
Step 1: The WordPress Plugin Initiates a Request
The plugin sends an HTTP request to an external API endpoint.
For example:
This endpoint represents a resource provided by the external service.
Step 2: The External API Receives the Request
The external server receives the request and checks its parameters, authentication credentials, and permissions.
If authentication is required, the API verifies whether the supplied credentials are valid.
Step 3: The External API Processes the Request
The external application performs the requested operation.
Depending on the API, it might retrieve product information, calculate shipping charges, verify a payment, or obtain customer information.
Step 4: The API Returns a Response
The external server sends a response to the WordPress plugin.
A typical JSON response might look like this:
{
    "success": true,
    "product": {
        "id": 101,
        "name": "Wireless Keyboard",
        "price": 29.99,
        "currency": "USD"
    }
}
Step 5: WordPress Processes the Response
The plugin receives the response, checks its status, decodes the JSON data, and extracts the required information.
Finally, the plugin can save the information in the WordPress database or display it through a shortcode, widget, block, or administration interface.
This communication process forms the foundation of most WordPress API integrations.
3. Choose the Right Third-Party API
Before developing an integration, identify which external API provides the functionality your plugin requires.
Not every API offers the same features, authentication methods, request limits, or response formats.
For example, a payment provider may require authenticated POST requests, while a public weather service might allow GET requests using an API key.
Consider the following factors when selecting an API.
API Documentation
Choose an API with clear technical documentation.
Its documentation should explain:
- Available API endpoints.
- Supported HTTP methods.
- Authentication requirements.
- Required request parameters.
- Response formats.
- Error codes.
- Rate limits.
- Usage restrictions.
API Availability
Check whether the external service provides reliable access and whether its endpoints are actively maintained.
An API that frequently experiences downtime may negatively affect your WordPress plugin.
Pricing and Request Limits
Some API providers offer free access with limited requests, while others require paid subscriptions.
Understand the provider’s pricing structure before implementing an integration.
Data Format
Most REST APIs return JSON responses, but some services support XML or other formats.
JSON is particularly convenient for WordPress developers because PHP provides built-in functions for encoding and decoding JSON data.
Useful documentation resources include the JSON specification and the PHP JSON functions reference.
4. Understand the WordPress HTTP API
WordPress provides a built-in HTTP API that allows plugins and themes to communicate with external services.
Developers should generally use WordPress HTTP API functions instead of implementing separate HTTP communication systems.
The most commonly used functions include:
| WordPress function | Purpose |
|---|---|
wp_remote_get() | Sends GET requests |
wp_remote_post() | Sends POST requests |
wp_remote_request() | Sends requests using different HTTP methods |
wp_remote_retrieve_body() | Retrieves the response body |
wp_remote_retrieve_response_code() | Retrieves the HTTP status code |
wp_remote_retrieve_header() | Retrieves a specific response header |
is_wp_error() | Checks whether a request returned a WordPress error |
These functions make external API integration easier and provide compatibility with the WordPress HTTP infrastructure.
You can explore the complete WordPress HTTP API documentation.
5. Create a Basic WordPress Plugin
Before connecting to an external API, create a basic WordPress plugin.
Navigate to:
wp-content/plugins/
Create a new directory:
third-party-api-integration
Inside this directory, create a PHP file:
third-party-api-integration.php
Add the following plugin header:
<?php
/**
 * Plugin Name: Third Party API Integration
 * Description: Demonstrates how to connect a WordPress plugin to an external REST API.
 * Version: 1.0.0
 * Author: Example Developer
 * License: GPL-2.0-or-later
 */

if ( ! defined( 'ABSPATH' ) ) {
    exit;
}
The ABSPATH check prevents the plugin file from being executed directly outside the normal WordPress environment.
You can now activate the plugin from:
WordPress Dashboard → Plugins → Installed Plugins
This provides the basic structure required for adding API integration functionality.
6. Send a GET Request to an External REST API
The GET method is commonly used to retrieve information from an external API.
For example, suppose your plugin needs to retrieve public information from an external service.
You can use the wp_remote_get() function.
Add the following code to your plugin:
function myplugin_get_api_data() {

    $api_url = 'https://api.example.com/v1/products';

    $response = wp_remote_get(
        $api_url,
        array(
            'timeout' => 15,
            'headers' => array(
                'Accept' => 'application/json',
            ),
        )
    );

    if ( is_wp_error( $response ) ) {
        return $response;
    }

    $status_code = wp_remote_retrieve_response_code( $response );

    if ( 200 !== $status_code ) {
        return new WP_Error(
            'api_request_failed',
            'The external API returned an unsuccessful response.'
        );
    }

    $body = wp_remote_retrieve_body( $response );

    $data = json_decode( $body, true );

    if ( JSON_ERROR_NONE !== json_last_error() ) {
        return new WP_Error(
            'invalid_api_response',
            'The API returned invalid JSON data.'
        );
    }

    return $data;
}
Understanding the Code
The function performs several important operations.
First, it defines the external API endpoint.
Next, wp_remote_get() sends an HTTP GET request to the specified URL.
The plugin checks whether the request returned a WP_Error object.
If the request succeeds, it retrieves the HTTP status code and response body.
Finally, json_decode() converts the JSON response into a PHP array.
The resulting information can then be used by other plugin functions.
Important: Replace the example API endpoint with the actual endpoint documented by your external service.
7. Send POST Requests to Submit Data to an External API
Sometimes a plugin needs to send information rather than retrieve it.
For example, a contact form plugin might submit customer information to an external CRM platform.
The HTTP POST method is commonly used for these operations.
WordPress provides the wp_remote_post() function for sending POST requests.
Consider the following example:
function myplugin_send_api_data() {

    $api_url = 'https://api.example.com/v1/customers';

    $customer_data = array(
        'name'  => 'John Smith',
        'email' => 'john@example.com',
    );

    $response = wp_remote_post(
        $api_url,
        array(
            'timeout' => 15,
            'headers' => array(
                'Content-Type' => 'application/json',
                'Accept'       => 'application/json',
            ),
            'body' => wp_json_encode( $customer_data ),
        )
    );

    if ( is_wp_error( $response ) ) {
        return $response;
    }

    $status_code = wp_remote_retrieve_response_code( $response );

    if ( $status_code < 200 || $status_code >= 300 ) {
        return new WP_Error(
            'api_submission_failed',
            'Unable to submit information to the external API.'
        );
    }

    $body = wp_remote_retrieve_body( $response );

    return json_decode( $body, true );
}
Why Use wp_json_encode()?
WordPress provides wp_json_encode() to encode PHP data into JSON.
This function is useful when submitting structured information to external APIs.
The receiving service can decode the JSON request and process the submitted information according to its requirements.
For production integrations, also validate the submitted data and handle invalid JSON responses explicitly.
8. Understand API Authentication Methods
Many third-party APIs require authentication before allowing access to protected resources.
Authentication helps external services identify the application making a request and determine whether it has permission to access particular functionality.
Different providers support different authentication methods.
API Key Authentication
API keys are commonly used to identify applications connecting to external services.
The provider generates a unique key, which must be included in API requests.
For example:
$api_key = 'YOUR_API_KEY';

$response = wp_remote_get(
    'https://api.example.com/v1/products',
    array(
        'headers' => array(
            'X-API-Key' => $api_key,
        ),
    )
);
Some providers use a different header, such as Authorization, or require the key as a query parameter.
Always follow the API provider’s authentication documentation.
Bearer Token Authentication
Bearer tokens are commonly used with modern REST APIs.
A request might include:
$access_token = 'YOUR_ACCESS_TOKEN';

$response = wp_remote_get(
    'https://api.example.com/v1/profile',
    array(
        'headers' => array(
            'Authorization' => 'Bearer ' . $access_token,
            'Accept'        => 'application/json',
        ),
    )
);
The external API checks the token before returning protected information.
OAuth 2.0 Authentication
OAuth 2.0 is commonly used when an application needs authorized access to another service on behalf of a user.
For example, a WordPress plugin might allow a website administrator to connect an external account.
The typical OAuth authorization process involves:
- Registering an application with the external provider.
- Obtaining a client ID and client secret.
- Redirecting the user to the provider’s authorization page.
- Receiving an authorization code.
- Exchanging the code for an access token.
- Using the access token for authorized API requests.
- Refreshing the token when required.
OAuth implementations must follow the provider’s supported authorization flow, including appropriate redirect URI validation, state protection, and token handling.
You can learn more through the official OAuth 2.0 framework specification.
Which Authentication Method Should You Use?
The correct authentication method depends on the external API.
For simple application-level access, an API key may be sufficient.
For protected resources, a bearer token may be required.
For user-authorized access to external accounts, OAuth 2.0 is often more appropriate.
Never assume that one authentication method works with every API.
9. Store API Credentials Securely in WordPress
API credentials should never be unnecessarily exposed to website visitors.
Hardcoding API keys directly into publicly accessible JavaScript files or frontend HTML is a serious security mistake.
Instead, store credentials on the server and retrieve them when the plugin makes an API request.
WordPress provides options APIs for storing plugin settings.
For example:
update_option(
    'myplugin_api_key',
    sanitize_text_field( $api_key ),
    false
);
The third parameter prevents the option from being automatically loaded with other options.
To retrieve the saved key:
$api_key = get_option( 'myplugin_api_key', '' );For sensitive credentials, remember that WordPress options are not automatically encrypted. Restrict administrative access, protect database backups, and consider an appropriate secrets-management solution for higher-security integrations.
Additional precautions include:
- Never display API keys in frontend HTML.
- Avoid including credentials in public error messages.
- Do not commit API secrets to public Git repositories.
- Use HTTPS for external API communication.
- Allow only authorized administrators to modify credentials.
- Use separate credentials for development and production.
- Revoke compromised or unnecessary API keys.
For more information, review the official WordPress security documentation.
10. Create an API Settings Page in WordPress
A professional plugin should allow administrators to configure API credentials without editing PHP files.
You can create a settings page where users enter their API key, endpoint configuration, or other integration details.
WordPress provides the Settings API for creating administrative configuration interfaces.
For example, you can register a settings page:
function myplugin_add_settings_page() {

    add_options_page(
        'API Integration Settings',
        'API Integration',
        'manage_options',
        'myplugin-api-settings',
        'myplugin_render_settings_page'
    );
}

add_action(
    'admin_menu',
    'myplugin_add_settings_page'
);
Next, register the API key setting:
function myplugin_register_settings() {

    register_setting(
        'myplugin_api_settings',
        'myplugin_api_key',
        array(
            'sanitize_callback' => 'sanitize_text_field',
        )
    );
}

add_action(
    'admin_init',
    'myplugin_register_settings'
);
Now create the settings page:
function myplugin_render_settings_page() {

    if ( ! current_user_can( 'manage_options' ) ) {
        return;
    }
    ?>

    <div class="wrap">

        <h1>API Integration Settings</h1>

        <form method="post" action="options.php">

            <?php
            settings_fields( 'myplugin_api_settings' );
            ?>

            <table class="form-table">

                <tr>
                    <th>
                        <label for="myplugin_api_key">
                            API Key
                        </label>
                    </th>

                    <td>
                        <input
                            type="password"
                            id="myplugin_api_key"
                            name="myplugin_api_key"
                            value="<?php echo esc_attr(
                                get_option( 'myplugin_api_key', '' )
                            ); ?>"
                            class="regular-text"
                        />
                    </td>
                </tr>

            </table>

            <?php submit_button(); ?>

        </form>

    </div>

    <?php
}
This example demonstrates the basic Settings API structure.
A production plugin should also provide appropriate secret-field behavior, connection testing, capability checks, validation, and clear instructions for configuring the external service.
You can explore the WordPress Settings API documentation for additional development guidance.
11. Process JSON Responses Correctly
Most REST APIs return information in JSON format.
Your plugin must decode and validate the returned information before using it.
Consider this example response:
{
    "status": "success",
    "data": {
        "name": "Example Product",
        "price": 49.99,
        "available": true
    }
}
You can process the response using PHP:
$body = wp_remote_retrieve_body( $response );

$data = json_decode( $body, true );

if ( JSON_ERROR_NONE !== json_last_error() ) {
    return new WP_Error(
        'invalid_json',
        'Unable to decode the API response.'
    );
}

if (
    ! isset( $data['data']['name'] ) ||
    ! isset( $data['data']['price'] )
) {
    return new WP_Error(
        'missing_api_fields',
        'The API response does not contain the required information.'
    );
}

$product_name  = sanitize_text_field( $data['data']['name'] );
$product_price = (float) $data['data']['price'];
Validate the Returned Data
Never assume that an external API will always return the expected information.
The response might contain missing fields, unexpected values, invalid data types, or an error message.
Validate important fields before using them.
Also remember that sanitization and escaping serve different purposes.
Sanitization helps prepare incoming data for a particular use, while escaping protects output when displaying information.
For example:
echo esc_html( $product_name );Using the appropriate escaping function helps prevent untrusted API data from being interpreted as executable HTML.
Review the WordPress data validation and sanitization documentation for more information.
12. Handle API Errors and Connection Failures
External API communication is not always successful.
The external server may be unavailable, the network connection may fail, credentials may expire, or the API may reject a request.
A reliable WordPress plugin must handle these situations gracefully.
Check for WP_Error
WordPress HTTP functions may return a WP_Error object when a request fails.
Always check the result:
if ( is_wp_error( $response ) ) {

    error_log(
        'API Error: ' . $response->get_error_message()
    );

    return false;
}
Do not assume that every request returns a valid response array.
Check HTTP Status Codes
HTTP status codes help identify the result of an API request.
Common examples include:
| Status code | Meaning |
|---|---|
| 200 | Request successful |
| 201 | Resource created |
| 204 | Successful request with no response body |
| 400 | Bad request |
| 401 | Authentication required or invalid |
| 403 | Access forbidden |
| 404 | Resource not found |
| 429 | Too many requests |
| 500 | Internal server error |
| 502 | Bad gateway |
| 503 | Service unavailable |
Your plugin should interpret these responses according to the external provider’s documentation.
Display Helpful Error Messages
Avoid showing technical server details or authentication credentials to ordinary visitors.
Instead, display understandable messages such as:
“Unable to retrieve information at this time. Please try again later.”
Detailed diagnostic information should be available to authorized administrators through appropriate logging.
13. Use API Caching to Improve WordPress Performance
Calling an external API on every page load can slow down your website.
For example, imagine that your plugin retrieves weather information every time someone opens the homepage.
If 1,000 visitors access the page, the plugin could generate 1,000 external API requests.
This may increase server load and consume the API provider’s request allowance.
Caching can reduce unnecessary requests.
Use WordPress Transients
WordPress Transients provide a convenient way to temporarily store API results.
For example:
function myplugin_get_cached_data() {

    $cached_data = get_transient(
        'myplugin_external_api_data'
    );

    if ( false !== $cached_data ) {
        return $cached_data;
    }

    $response = wp_remote_get(
        'https://api.example.com/v1/products',
        array(
            'timeout' => 15,
        )
    );

    if ( is_wp_error( $response ) ) {
        return $response;
    }

    $status_code = wp_remote_retrieve_response_code(
        $response
    );

    if ( 200 !== $status_code ) {
        return new WP_Error(
            'api_failed',
            'Unable to retrieve external data.'
        );
    }

    $data = json_decode(
        wp_remote_retrieve_body( $response ),
        true
    );

    if ( JSON_ERROR_NONE !== json_last_error() ) {
        return new WP_Error(
            'invalid_json',
            'The external API returned invalid data.'
        );
    }

    set_transient(
        'myplugin_external_api_data',
        $data,
        15 * MINUTE_IN_SECONDS
    );

    return $data;
}
This example stores successful API results for 15 minutes.
The next request can use the cached information instead of immediately contacting the external service.
Choose the expiration period according to the data’s freshness requirements and the API provider’s caching rules.
For frequently changing information, use shorter caching periods. For relatively static information, longer caching periods may be appropriate.
14. Use Webhooks for Real-Time External Updates
Some integrations require more than sending requests and retrieving responses.
For example, a payment gateway may need to notify your WordPress plugin when a transaction has been completed.
Webhooks provide a solution.
A webhook allows an external service to send an HTTP request to a URL on your WordPress website when a particular event occurs.
Common webhook applications include:
- Payment confirmation.
- Order status changes.
- Subscription updates.
- Customer registration.
- Inventory changes.
- External account notifications.
Create a WordPress REST API Endpoint
WordPress allows plugin developers to register custom REST API routes.
For example:
add_action( 'rest_api_init', function () {

    register_rest_route(
        'myplugin/v1',
        '/webhook',
        array(
            'methods'  => 'POST',
            'callback' => 'myplugin_receive_webhook',
            'permission_callback' => '__return_true',
        )
    );

} );

function myplugin_receive_webhook( $request ) {

    $data = $request->get_json_params();

    if ( empty( $data ) || ! is_array( $data ) ) {
        return new WP_Error(
            'invalid_webhook_data',
            'Invalid webhook information.',
            array( 'status' => 400 )
        );
    }

    return rest_ensure_response(
        array(
            'success' => true,
        )
    );
}
The endpoint would be available at:
Security warning: The example above is only a basic endpoint demonstration. A production webhook must verify the provider’s signature or another documented authentication mechanism before trusting or processing incoming data. It should also validate event types, prevent replay attacks where applicable, and handle duplicate event deliveries safely.
Learn more about registering routes through the WordPress REST API Handbook.
15. Protect Your Plugin Against API Security Risks
Security should be considered from the beginning of API integration development.
External APIs can introduce additional risks because your plugin communicates with servers outside your WordPress installation.
Use HTTPS Endpoints
Always use HTTPS when communicating with external APIs.
HTTPS protects information transmitted between your WordPress server and the external service.
Validate External URLs
Avoid allowing untrusted users to supply arbitrary API URLs.
A URL-controlled request could expose your server to Server-Side Request Forgery (SSRF) attacks.
When working with user-controlled URLs, use WordPress safe HTTP functions such as wp_safe_remote_get() or wp_safe_remote_post() and apply strict URL and destination validation.
For fixed, developer-controlled API endpoints, use the appropriate WordPress HTTP function with a known HTTPS destination.
Protect API Credentials
Never expose API keys or access tokens through:
- Frontend JavaScript.
- Public HTML source.
- Shortcode output.
- Public REST API responses.
- Unprotected diagnostic logs.
Add Permission Checks
Only authorized users should be able to change sensitive plugin settings.
For example:
if ( ! current_user_can( 'manage_options' ) ) {
    return;
}
For public-facing forms, also use appropriate validation, rate limiting, and abuse protection.
Prevent Cross-Site Request Forgery
When processing administrative actions, use WordPress nonces and appropriate capability checks.
A nonce helps verify that a request originated from an expected WordPress interaction, but it does not replace authorization checks.
The WordPress Nonces Documentation explains how to implement this protection.
16. Troubleshoot Common WordPress REST API Integration Problems
Even properly developed API integrations can encounter unexpected problems.
Understanding common errors helps developers identify and resolve them efficiently.
API Connection Timeout
Problem: The plugin cannot connect to the external API within the allowed time.
Possible causes:
- External server is unavailable.
- Hosting provider blocks outgoing connections.
- Network connectivity problems.
- API response is unusually slow.
Solutions:
- Check the API endpoint.
- Verify outbound HTTPS connectivity.
- Review hosting firewall restrictions.
- Set a reasonable request timeout.
- Contact the external API provider if necessary.
HTTP 401 Unauthorized Error
Problem: The API rejects the request because authentication is missing or invalid.
Possible causes:
- Incorrect API key.
- Expired access token.
- Incorrect authorization header.
- Incorrect authentication format.
Solutions:
- Verify the credentials.
- Check the provider’s authentication documentation.
- Generate a replacement API key if necessary.
- Implement the correct token refresh process.
HTTP 403 Forbidden Error
Problem: The API recognizes the request but refuses access.
Possible causes:
- Insufficient permissions.
- Missing account subscription.
- Restricted API access.
- Incorrect account configuration.
Solutions:
- Check the API account permissions.
- Verify the required scopes.
- Confirm that the endpoint is included in your subscription.
HTTP 404 Not Found Error
Problem: The requested API resource cannot be found.
Possible causes:
- Incorrect endpoint.
- Invalid resource identifier.
- Outdated API version.
- Removed API route.
Solutions:
- Review the API documentation.
- Check the endpoint structure.
- Verify the resource identifier.
- Confirm that the API version remains supported.
Invalid JSON Response
Problem: The plugin cannot decode the API response.
Possible causes:
- External server returns HTML instead of JSON.
- API returns an empty response.
- Response contains malformed JSON.
- Authentication failure produces an unexpected response format.
Solutions:
- Inspect the HTTP status code.
- Check the response content type.
- Review the returned body safely.
- Verify the API response format.
- Handle empty responses where appropriate.
HTTP 429 Too Many Requests
Problem: The external service rejects requests because the application has exceeded its request limit.
Solutions:
- Implement caching.
- Reduce unnecessary API requests.
- Respect the provider’s rate limits.
- Follow the
Retry-Afterresponse header when supplied. - Use controlled retry mechanisms.
Do not repeatedly retry failed requests without limits, as this can make rate-limiting problems worse.
17. Test the API Integration Before Releasing Your Plugin
Testing is an important part of professional plugin development.
An integration that works on a local development website may behave differently on a production hosting environment.
Before releasing your plugin, test its functionality under different conditions.
Test Successful API Requests
Verify that the plugin can retrieve information and process successful API responses.
Test Invalid Credentials
Enter an incorrect API key and confirm that the plugin displays an understandable error message.
Test Unavailable APIs
Temporarily simulate an unsuccessful connection and verify that the plugin handles the failure without breaking the website.
Test Missing Response Fields
Use sample responses that contain missing or unexpected fields.
Confirm that the plugin does not generate PHP warnings or fatal errors.
Test Different PHP Versions
Where practical, test the plugin against the PHP versions it claims to support.
Test WordPress Compatibility
Check the plugin against supported WordPress versions and relevant themes or other plugins.
Test Frontend and Backend Functionality
Verify that API data displays correctly on the frontend and that administrators can manage integration settings through the dashboard.
You can use tools such as Postman to test API endpoints independently before implementing them in PHP.
18. Follow WordPress Coding Standards When Developing API Integrations
A professional WordPress plugin should follow established development standards.
Good coding practices improve compatibility, security, readability, and long-term maintenance.
Consider the following recommendations.
- Use WordPress HTTP API functions.
- Follow WordPress PHP coding standards.
- Prefix custom functions to avoid naming conflicts.
- Validate incoming information.
- Sanitize data before storing it.
- Escape information before displaying it.
- Protect sensitive settings.
- Use meaningful error messages.
- Implement caching where appropriate.
- Set reasonable request timeouts.
- Avoid unnecessary external API requests.
- Document API configuration requirements.
- Keep external API credentials separate from plugin source code.
You can review the official WordPress Coding Standards before preparing a plugin for distribution.
19. Practical Examples of WordPress Third-Party API Integrations
Understanding real-world applications makes it easier to identify opportunities for API integration.
Weather Information Plugin
A weather plugin can connect to an external weather API to retrieve temperature, humidity, wind speed, and forecast information.
The plugin can display the results through a shortcode or Gutenberg block.
Payment Gateway Plugin
A payment plugin can communicate with an external payment provider to initiate transactions, verify payments, and receive transaction notifications.
Security, authentication, and webhook verification are particularly important in this type of integration.
Product Synchronization Plugin
An eCommerce plugin can connect to an external inventory system to retrieve product names, prices, stock quantities, and descriptions.
The plugin can synchronize the information with WooCommerce.
Google Maps Integration
A location-based plugin can communicate with mapping services to display maps, calculate routes, or retrieve location information.
AI-Powered WordPress Plugin
An AI integration plugin can send user-approved content to an external AI service and display the returned results inside the WordPress dashboard.
In each example, the basic integration process remains similar: authenticate, send an HTTP request, process the response, validate the information, and handle errors.
20. Final Thoughts: Build Reliable WordPress Plugins With Third-Party REST API Integration
Connecting a WordPress plugin to a third-party REST API provides developers with opportunities to create more powerful and flexible website functionality.
External APIs allow WordPress plugins to communicate with payment platforms, mapping services, weather providers, customer management systems, inventory databases, artificial intelligence services, and many other applications.
However, successful API integration involves more than sending an HTTP request and displaying the returned information.
Developers must understand authentication methods, HTTP status codes, JSON processing, API limitations, data validation, caching, and security requirements.
WordPress provides useful built-in functionality through its HTTP API, Settings API, Transients API, and REST API infrastructure. Using these facilities helps developers create integrations that follow established WordPress development practices.
Before releasing an API-connected plugin, test successful requests, invalid credentials, unavailable endpoints, unexpected responses, and rate-limiting conditions.
Also protect API credentials, use HTTPS, validate incoming information, and avoid exposing sensitive data to website visitors.
By following these development practices, you can build reliable WordPress plugins that communicate effectively with external services while maintaining website security, performance, and compatibility.
Whether you are developing a simple information-retrieval plugin or a complex business integration, understanding third-party REST API communication is an important skill for modern WordPress plugin development.