Introduction
WordPress provides several ways to store information, including posts, post meta, user meta, options, and taxonomies. These built-in storage mechanisms are suitable for many plugin features. However, some plugins need to manage large amounts of structured data that do not naturally fit into WordPress posts or metadata.
For example, a visitor tracking plugin may need to record thousands of page views. A booking plugin might store appointment records, while a newsletter plugin could maintain subscriber activity, delivery logs, and campaign statistics. In these situations, creating a custom database table can provide a more organized and efficient storage structure.
A custom database table allows developers to define their own columns, data types, indexes, and relationships. WordPress plugins can interact with these tables through the global $wpdb database object.
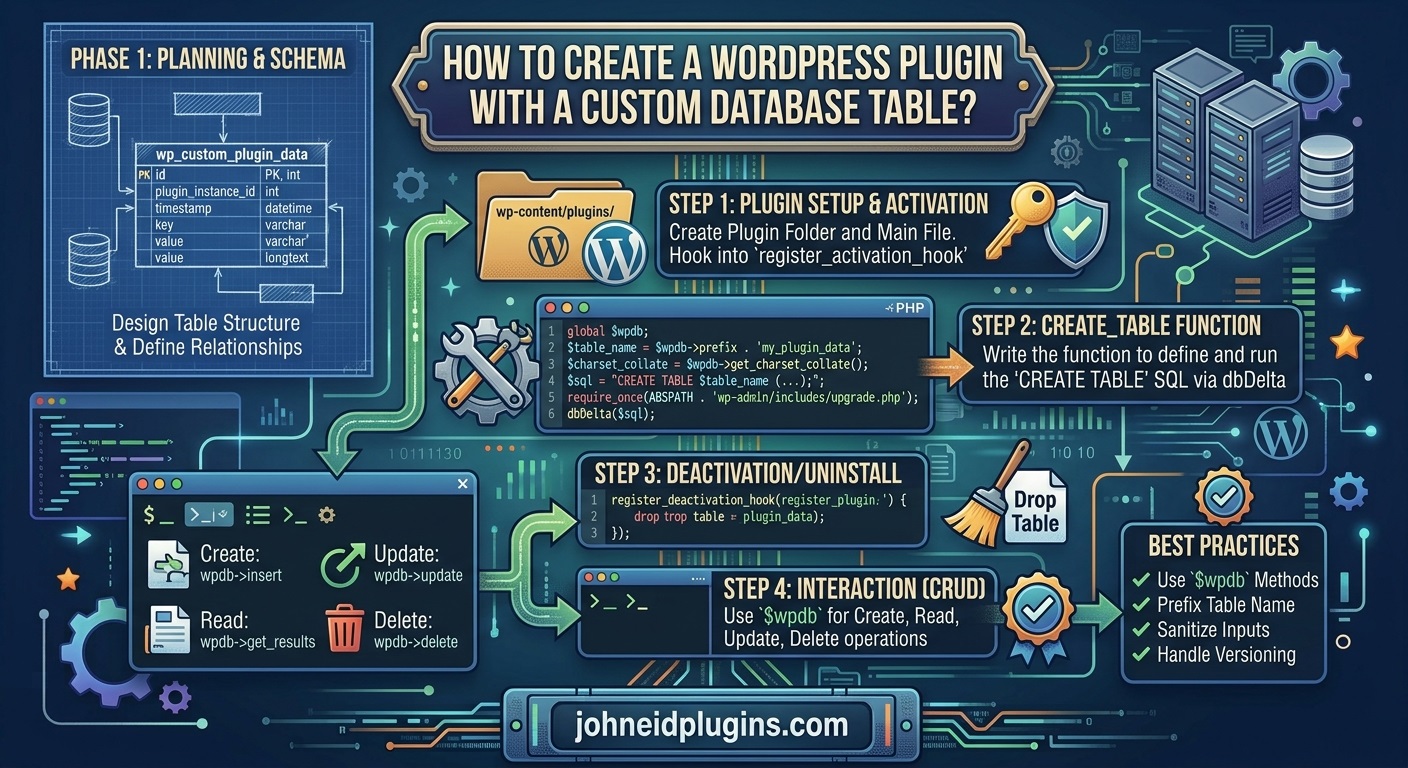
This guide explains how to create a WordPress plugin with a custom database table, automatically create the table during activation, insert and retrieve records, protect database operations, and upgrade the database structure when the plugin receives new versions.
Whether you are developing a simple data-management plugin or a larger WordPress application, understanding custom database tables is an important plugin development skill.
1. Understand When a Custom Database Table Is Necessary
Before creating a database table, consider whether WordPress already provides an appropriate storage mechanism.
WordPress has several standard database tables:
wp_postsstores posts, pages, and custom post types.wp_postmetastores additional information associated with posts.wp_usersstores user accounts.wp_usermetastores additional user information.wp_optionsstores website settings and configuration.wp_commentsstores comments.
For many plugin features, these existing tables are sufficient.
For example, if your plugin adds a few custom fields to WordPress posts, using post meta is generally preferable to creating a separate table. Similarly, plugin configuration values that rarely change should normally be stored through the WordPress Options API.
A custom database table becomes useful when:
- Your plugin stores thousands or millions of records.
- Records have a structured format with several related fields.
- You need to perform frequent filtering, sorting, and reporting.
- Your data does not naturally belong to posts, users, or comments.
- You need indexes designed around specific database queries.
- You want to manage independent records with their own lifecycle.
For example, a visitor analytics plugin could create a table containing visitor identifiers, page URLs, timestamps, and device information.
The important principle is to use existing WordPress storage whenever practical and introduce custom tables when they provide a genuine architectural benefit.
You can learn more about this decision in the official WordPress documentation on creating database tables with plugins.
2. Create a WordPress Plugin Directory
The first step is to create a directory for your plugin.
Navigate to:
wp-content/plugins/
Create a new folder named:
johneid-custom-records
Inside this directory, create the main plugin file:
johneid-custom-records.php
Your initial plugin structure will look like this:
johneid-custom-records/
│
├── johneid-custom-records.php
├── uninstall.php
│
└── includes/
    └── database.php
For a small plugin, you can initially keep the database functionality inside the main PHP file. As the project grows, separating database operations into their own files makes the code easier to maintain.
Every WordPress plugin needs a valid plugin header. Add the following code to the main PHP file:
<?php
/**
 * Plugin Name: Johneid Custom Records
 * Description: Demonstrates how to create and manage a custom database table in WordPress.
 * Version: 1.0.0
 * Author: Johneid Plugins
 * License: GPL-2.0-or-later
 * Text Domain: johneid-custom-records
 */

if ( ! defined( 'ABSPATH' ) ) {
    exit;
}
The ABSPATH check prevents the PHP file from being accessed directly outside the normal WordPress loading process.
For more information about plugin structure and metadata, consult the WordPress Plugin Handbook.
3. Design the Custom Database Table
Before writing SQL, decide what information the plugin needs to store.
For this example, imagine that you are developing a simple record-management plugin. It will store a record title, description, status, and creation date.
The proposed table will contain the following columns:
| Column | Data type | Purpose |
|---|---|---|
| id | bigint(20) unsigned | Unique record identifier |
| title | varchar(255) | Record title |
| description | text | Record description |
| status | varchar(20) | Record status |
| created_at | datetime | Record creation date |
The id column will be the primary key. It will automatically increase whenever a new record is inserted.
The status column will make it possible to filter records by their current state, such as active or inactive.
A database index on the status column can improve queries that frequently filter records using that field.
Use the WordPress database prefix
WordPress installations do not always use the default wp_ database prefix. A website administrator can choose a different prefix during installation.
Therefore, never assume that your custom table should always start with wp_.
Use:
global $wpdb;

$table_name = $wpdb->prefix . 'je_custom_records';
If the site’s prefix is wp_, the resulting table name will be:
wp_je_custom_records
If the administrator uses site123_, the resulting name will be:
site123_je_custom_records
Using $wpdb->prefix makes the plugin compatible with installations that use different database prefixes.
4. Create the Database Table with dbDelta()
WordPress provides a function called dbDelta() for creating and modifying database tables.
It is especially useful for plugins because it compares the requested table structure with the existing database structure and applies necessary changes.
The function is available through:
wp-admin/includes/upgrade.php
This file is not automatically loaded on every request, so you must include it before calling dbDelta().
Add the following function to your plugin:
function jecr_create_database_table() {

    global $wpdb;

    $table_name = $wpdb->prefix . 'je_custom_records';

    $charset_collate = $wpdb->get_charset_collate();

    $sql = "CREATE TABLE $table_name (
        id bigint(20) unsigned NOT NULL AUTO_INCREMENT,
        title varchar(255) NOT NULL,
        description text NOT NULL,
        status varchar(20) NOT NULL DEFAULT 'active',
        created_at datetime NOT NULL,
        PRIMARY KEY  (id),
        KEY status (status)
    ) $charset_collate;";

    require_once ABSPATH . 'wp-admin/includes/upgrade.php';

    dbDelta( $sql );
}
Let’s understand the important parts.
global $wpdb: Makes the WordPress database object available inside the function.
$wpdb->prefix: Retrieves the database prefix configured for the current WordPress site.
$wpdb->get_charset_collate(): Returns the appropriate character set and collation settings for the database.
CREATE TABLE: Defines the new database table and its columns.
PRIMARY KEY: Identifies the unique record ID.
KEY status: Creates an index that can help queries filtering by status.
dbDelta(): Creates the table or adjusts its structure when the required changes are supported.
Important dbDelta() formatting rules
The dbDelta() function is particular about SQL formatting. A statement that is valid SQL may still not be interpreted as expected by dbDelta().
Follow these conventions:
- Put each column definition on a separate line.
- Use two spaces between
PRIMARY KEYand its opening parenthesis. - Use
KEYinstead ofINDEXwhen defining indexes. - Keep field types in lowercase.
- Use uppercase SQL keywords such as
CREATE TABLE. - Avoid quoting column names with backticks or apostrophes.
- Specify appropriate lengths for column types that require them.
These conventions help dbDelta() identify the table structure correctly.
Read the official dbDelta() function reference for additional technical details.
5. Automatically Create the Table During Plugin Activation
A plugin should not require users to create database tables manually through phpMyAdmin or execute SQL commands themselves.
WordPress provides activation hooks that allow developers to execute installation tasks when an administrator activates a plugin.
Register the database creation function using:
register_activation_hook(
    __FILE__,
    'jecr_create_database_table'
);
Place this code in the main plugin file, outside the function definition.
The activation process will now call jecr_create_database_table() when the plugin is activated.
The complete database creation and activation code looks like this:
function jecr_create_database_table() {

    global $wpdb;

    $table_name = $wpdb->prefix . 'je_custom_records';

    $charset_collate = $wpdb->get_charset_collate();

    $sql = "CREATE TABLE $table_name (
        id bigint(20) unsigned NOT NULL AUTO_INCREMENT,
        title varchar(255) NOT NULL,
        description text NOT NULL,
        status varchar(20) NOT NULL DEFAULT 'active',
        created_at datetime NOT NULL,
        PRIMARY KEY  (id),
        KEY status (status)
    ) $charset_collate;";

    require_once ABSPATH . 'wp-admin/includes/upgrade.php';

    dbDelta( $sql );
}

register_activation_hook(
    __FILE__,
    'jecr_create_database_table'
);
After adding the code, visit the WordPress dashboard, open Plugins, and activate Johneid Custom Records.
WordPress will execute the activation callback and create the custom table.
For a broader understanding of activation, deactivation, and uninstall behavior, see the WordPress plugin lifecycle documentation.
6. Insert Records into the Custom Database Table
Creating a table is only the beginning. Your plugin also needs a way to save information.
WordPress provides several useful $wpdb methods, including:
$wpdb->insert()$wpdb->update()$wpdb->delete()$wpdb->get_results()$wpdb->get_row()$wpdb->get_var()$wpdb->prepare()
For basic insert operations, $wpdb->insert() is convenient because WordPress handles the appropriate value formatting and escaping.
Create a function like this:
function jecr_insert_record( $title, $description ) {

    global $wpdb;

    $table_name = $wpdb->prefix . 'je_custom_records';

    $result = $wpdb->insert(
        $table_name,
        array(
            'title'       => sanitize_text_field( $title ),
            'description' => sanitize_textarea_field( $description ),
            'status'      => 'active',
            'created_at'  => current_time( 'mysql' ),
        ),
        array(
            '%s',
            '%s',
            '%s',
            '%s',
        )
    );

    if ( false === $result ) {
        return false;
    }

    return $wpdb->insert_id;
}
This function accepts a title and description, sanitizes both values, and inserts them into the custom table.
The current_time( 'mysql' ) function obtains the current WordPress-local date and time in MySQL format.
The function returns the newly created record ID if the insert succeeds. It returns false if the database operation fails.
Why sanitization matters
Never assume that information submitted through a form is safe.
Use appropriate sanitization functions based on the expected data type. For example:
sanitize_text_field()for ordinary text.sanitize_textarea_field()for textarea content.sanitize_email()for email addresses.absint()for positive integer values.
Sanitization should happen before storing untrusted input. Validation should also confirm that the submitted value meets the plugin’s requirements.
Read the official guide to sanitizing input in WordPress.
7. Retrieve Records from the Custom Table
After inserting records, your plugin needs to retrieve them.
The $wpdb->get_results() method can return multiple database records.
For example:
function jecr_get_records() {

    global $wpdb;

    $table_name = $wpdb->prefix . 'je_custom_records';

    $sql = "SELECT * FROM $table_name
            ORDER BY created_at DESC";

    return $wpdb->get_results( $sql );
}
This function retrieves all records and sorts them by creation date, with the newest records appearing first.
You can use the returned data to create an administration table, display a report, or generate a frontend listing.
For larger datasets, avoid retrieving every record at once. Use pagination and retrieve only the records required for the current page.
Retrieve records with a condition
Suppose you only want active records.
Use $wpdb->prepare() to safely handle dynamic query values:
function jecr_get_active_records() {

    global $wpdb;

    $table_name = $wpdb->prefix . 'je_custom_records';

    $sql = $wpdb->prepare(
        "SELECT * FROM $table_name WHERE status = %s ORDER BY created_at DESC",
        'active'
    );

    return $wpdb->get_results( $sql );
}
The %s placeholder represents a string value.
Other commonly used placeholders include:
%dfor integers.%ffor floating-point values.%sfor strings.
The table name in this example is generated from the trusted WordPress database prefix. SQL identifiers such as table names should not be treated like ordinary value placeholders.
For more information, read the wpdb class reference.
8. Display Database Records in the WordPress Dashboard
A practical plugin should provide an interface for administrators to manage stored information.
WordPress allows plugins to add administration pages using add_menu_page().
The following example registers a simple page:
add_action( 'admin_menu', 'jecr_register_admin_page' );

function jecr_register_admin_page() {

    add_menu_page(
        'Custom Records',
        'Custom Records',
        'manage_options',
        'jecr-records',
        'jecr_render_admin_page',
        'dashicons-database',
        25
    );
}
The manage_options capability restricts access to users who are allowed to manage website settings.
Next, create the page callback:
function jecr_render_admin_page() {

    if ( ! current_user_can( 'manage_options' ) ) {
        return;
    }

    $records = jecr_get_records();

    echo '<div class="wrap">';
    echo '<h1>Custom Records</h1>';

    if ( empty( $records ) ) {

        echo '<p>No records found.</p>';

    } else {

        echo '<table class="widefat striped">';
        echo '<thead>';
        echo '<tr>';
        echo '<th>ID</th>';
        echo '<th>Title</th>';
        echo '<th>Description</th>';
        echo '<th>Status</th>';
        echo '<th>Created At</th>';
        echo '</tr>';
        echo '</thead>';
        echo '<tbody>';

        foreach ( $records as $record ) {

            echo '<tr>';

            echo '<td>' . esc_html( $record->id ) . '</td>';
            echo '<td>' . esc_html( $record->title ) . '</td>';
            echo '<td>' . esc_html( $record->description ) . '</td>';
            echo '<td>' . esc_html( $record->status ) . '</td>';
            echo '<td>' . esc_html( $record->created_at ) . '</td>';

            echo '</tr>';
        }

        echo '</tbody>';
        echo '</table>';
    }

    echo '</div>';
}
This example displays the records in a basic WordPress administration table.
Notice the use of esc_html() when displaying database values. Data should be escaped at the point where it is output, even if it was sanitized before being stored.
This helps protect the dashboard against cross-site scripting vulnerabilities.
For additional guidance, review the WordPress documentation on escaping output.
9. Add a Secure Form to Save New Records
A database-management plugin needs a form through which authorized users can submit new records.
A secure form should include:
- A capability check.
- A WordPress nonce.
- Input sanitization.
- Input validation.
- Proper feedback after submission.
For example, add this form inside your administration page:
echo '<form method="post">';

wp_nonce_field( 'jecr_save_record', 'jecr_nonce' );

echo '<p>';
echo '<label for="jecr_title">Title</label><br>';
echo '<input type="text" id="jecr_title" name="jecr_title" required>';
echo '</p>';

echo '<p>';
echo '<label for="jecr_description">Description</label><br>';
echo '<textarea id="jecr_description" name="jecr_description"></textarea>';
echo '</p>';

submit_button( 'Save Record' );

echo '</form>';
You must also process the submitted data.
function jecr_handle_form_submission() {

    if ( ! is_admin() ) {
        return;
    }

    if ( ! isset( $_POST['jecr_nonce'] ) ) {
        return;
    }

    $nonce = sanitize_text_field(
        wp_unslash( $_POST['jecr_nonce'] )
    );

    if ( ! wp_verify_nonce( $nonce, 'jecr_save_record' ) ) {
        return;
    }

    if ( ! current_user_can( 'manage_options' ) ) {
        return;
    }

    $title = isset( $_POST['jecr_title'] )
        ? sanitize_text_field( wp_unslash( $_POST['jecr_title'] ) )
        : '';

    $description = isset( $_POST['jecr_description'] )
        ? sanitize_textarea_field( wp_unslash( $_POST['jecr_description'] ) )
        : '';

    if ( '' === $title ) {
        return;
    }

    jecr_insert_record( $title, $description );
}

add_action( 'admin_init', 'jecr_handle_form_submission' );
This is a basic example. A production plugin should also provide clear success and error notices, avoid processing the same submission repeatedly, and redirect after successful form processing using the Post/Redirect/Get pattern.
A nonce helps verify that a request originated from an expected interaction with your website. However, a nonce does not replace authorization. Always check the user’s capabilities separately.
See the official WordPress guides to nonces and checking user capabilities.
10. Update Existing Records
Most database-driven plugins need to modify existing records.
Use $wpdb->update() rather than building an SQL update statement manually.
For example:
function jecr_update_record( $record_id, $title, $description ) {

    global $wpdb;

    $table_name = $wpdb->prefix . 'je_custom_records';

    $record_id = absint( $record_id );

    if ( ! $record_id ) {
        return false;
    }

    return $wpdb->update(
        $table_name,
        array(
            'title'       => sanitize_text_field( $title ),
            'description' => sanitize_textarea_field( $description ),
        ),
        array(
            'id' => $record_id,
        ),
        array(
            '%s',
            '%s',
        ),
        array(
            '%d',
        )
    );
}
The first array contains the values to update. The second array identifies the record that should be modified.
The return value can be:
- An integer representing the number of affected rows.
0when no rows were changed.falsewhen the operation failed.
Do not interpret a return value of zero as a database error. It may simply mean that the submitted values were identical to the existing values.
11. Delete Records Safely
Plugins should also provide a controlled method for deleting records.
The $wpdb->delete() method can delete a record using its ID.
function jecr_delete_record( $record_id ) {

    global $wpdb;

    $table_name = $wpdb->prefix . 'je_custom_records';

    $record_id = absint( $record_id );

    if ( ! $record_id ) {
        return false;
    }

    return $wpdb->delete(
        $table_name,
        array(
            'id' => $record_id,
        ),
        array(
            '%d',
        )
    );
}
Never allow an unauthenticated visitor to delete database records simply by submitting an ID.
For an administration delete action, verify the user’s capability, check a nonce associated with the action, validate the record ID, and consider displaying a confirmation step before deletion.
For bulk deletion, validate every selected identifier and use appropriate database queries rather than trusting submitted arrays.
12. Manage Database Schema Changes with a Version Number
A custom database table may need to change as your plugin develops.
For example, version 1.0 may contain only a title and description. Later, version 1.1 might introduce a category column or an index for faster filtering.
Simply changing the SQL statement inside the activation function is not sufficient. WordPress does not normally execute a plugin’s activation hook whenever the plugin is updated.
A reliable solution is to maintain a database schema version.
Define a version constant:
define( 'JECR_DB_VERSION', '1.1.0' );Update the database creation function to save the version after running dbDelta():
function jecr_create_database_table() {

    global $wpdb;

    $table_name = $wpdb->prefix . 'je_custom_records';

    $charset_collate = $wpdb->get_charset_collate();

    $sql = "CREATE TABLE $table_name (
        id bigint(20) unsigned NOT NULL AUTO_INCREMENT,
        title varchar(255) NOT NULL,
        description text NOT NULL,
        status varchar(20) NOT NULL DEFAULT 'active',
        created_at datetime NOT NULL,
        PRIMARY KEY  (id),
        KEY status (status)
    ) $charset_collate;";

    require_once ABSPATH . 'wp-admin/includes/upgrade.php';

    dbDelta( $sql );

    update_option( 'jecr_db_version', JECR_DB_VERSION );
}
Next, create a function that checks whether the installed database version is older than the version required by the plugin:
function jecr_check_database_version() {

    $installed_version = get_option( 'jecr_db_version', '0' );

    if ( version_compare(
        $installed_version,
        JECR_DB_VERSION,
        '<'
    ) ) {
        jecr_create_database_table();
    }
}

add_action( 'plugins_loaded', 'jecr_check_database_version' );
When the plugin loads, WordPress checks the stored database version. If the version is outdated, the database installation function runs again.
This allows dbDelta() to apply compatible schema changes without requiring the administrator to deactivate and reactivate the plugin.
For more complex upgrades, use explicit migration functions. For example, a migration might need to transform existing data, populate a new column, or split one table into two.
A good migration process should:
- Identify the current database version.
- Determine which migration steps are required.
- Run migrations in a controlled sequence.
- Check for database errors.
- Update the stored version only after successful completion.
- Preserve existing user data wherever possible.
Do not assume that every schema change can safely be handled by dbDelta(). Data transformations and destructive changes require additional logic and testing.
13. Remove Database Tables During Uninstallation
When users delete a plugin, you need to decide what should happen to its stored data.
Some plugins should preserve information so that users can reinstall them later. Others may offer a setting that allows administrators to remove all plugin data permanently.
If your plugin is designed to delete its custom table during uninstall, create an uninstall.php file in the plugin directory.
For example:
<?php

if ( ! defined( 'WP_UNINSTALL_PLUGIN' ) ) {
    exit;
}

global $wpdb;

$table_name = $wpdb->prefix . 'je_custom_records';

$wpdb->query(
    "DROP TABLE IF EXISTS $table_name"
);

delete_option( 'jecr_db_version' );
WordPress defines WP_UNINSTALL_PLUGIN when it executes the plugin’s uninstall procedure. This prevents the file from being used as an ordinary public PHP entry point.
Important: The example above permanently deletes the table and its records. Do not include this behavior without considering the user’s expectations.
A production plugin may provide a setting such as “Delete all plugin data when uninstalling.” If the setting is disabled, preserve the database table and related options.
For plugins that manage personal information, also consider WordPress privacy requirements, including personal data export and erasure functionality.
Read the WordPress plugin uninstall documentation and the plugin privacy handbook.
14. Improve Custom Database Table Performance
A custom database table gives developers control over its structure, but poor database design can still slow down a WordPress website.
Consider these performance practices:
Create appropriate indexes. Index columns used frequently in WHERE, JOIN, and sorting operations. Avoid creating unnecessary indexes because they increase storage requirements and can slow down insert and update operations.
Use pagination. Do not retrieve thousands of rows when an administrator only needs to see 20 records.
For example:
$per_page = 20;
$page     = max( 1, absint( $_GET['paged'] ?? 1 ) );
$offset   = ( $page - 1 ) * $per_page;

$sql = $wpdb->prepare(
    "SELECT * FROM $table_name
     ORDER BY created_at DESC
     LIMIT %d OFFSET %d",
    $per_page,
    $offset
);

$records = $wpdb->get_results( $sql );
In production code, also validate the table name and make sure the query runs only in the appropriate administrative context.
Avoid unnecessary queries. Do not retrieve the same database records repeatedly during one request if the result can be reused.
Select only the required columns. Instead of always using SELECT *, request the specific columns needed by the current operation.
Use suitable data types. Choose column types according to the data being stored. For example, use integer columns for numeric identifiers and appropriately sized varchar columns for short text.
Monitor query performance. Tools such as Query Monitor can help developers identify slow database queries and investigate performance problems.
For large datasets, also consider archiving old records, scheduled cleanup jobs, and carefully designed database maintenance processes.
15. Common Mistakes to Avoid
Developers often encounter problems when building plugins with custom database tables. The following mistakes are particularly important to avoid.
Using a hardcoded database prefix
Using wp_je_custom_records directly can break the plugin on websites with a different database prefix.
Always build the table name using $wpdb->prefix.
Creating tables without dbDelta()
Direct SQL statements can create tables, but they do not automatically provide the same convenient schema comparison and upgrade behavior as dbDelta().
Use the WordPress-supported function for ordinary table creation and compatible schema changes.
Forgetting the character set and collation
If the table does not use the correct character set, multilingual text and special characters may not be stored correctly.
Use $wpdb->get_charset_collate() when defining the table.
Ignoring database upgrades
A plugin update may introduce new columns or indexes. Without a database version check, the PHP code may expect fields that do not exist.
Implement a schema version and migration process.
Trusting submitted data
Never insert form data directly into SQL statements. Sanitize and validate inputs, and use the appropriate $wpdb methods or $wpdb->prepare().
Forgetting output escaping
Data retrieved from a database should be escaped before it is displayed in HTML. Use functions such as esc_html(), esc_attr(), and esc_url() according to the output context.
Deleting user data unexpectedly
Removing a plugin should not automatically destroy valuable records unless that behavior is clearly documented and appropriate.
Provide a deliberate data-retention policy.
16. Test Your Plugin Before Publishing
Testing is an essential part of WordPress plugin development.
Before releasing a database-driven plugin, test it in a staging environment.
Your testing process should include:
- Install the plugin on a clean WordPress website.
- Activate it and confirm that the custom table is created.
- Check the table name and database prefix.
- Insert records through the plugin interface.
- Confirm that records are stored correctly.
- Retrieve and display saved records.
- Update existing records.
- Delete records using authorized actions.
- Test invalid and empty form submissions.
- Test requests without valid nonces.
- Test access using different WordPress user roles.
- Upgrade the plugin and confirm that database migrations work.
- Test plugin deactivation and reactivation.
- Test the uninstall behavior.
- Check the PHP error log and database errors.
You should also test with a different database prefix and, where practical, on supported MySQL and MariaDB versions.
Use a staging website rather than experimenting directly on a production database. Always take a backup before running migrations that modify or remove existing data.
17. Recommended Structure for a Professional Database-Driven Plugin
As your plugin becomes more complex, avoid placing every function in one PHP file.
A more maintainable directory structure could look like this:
johneid-custom-records/
│
├── johneid-custom-records.php
│
├── includes/
│   ├── class-database.php
│   ├── class-records.php
│   ├── class-admin.php
│   ├── class-frontend.php
│   └── class-migrations.php
│
├── admin/
│   ├── views/
│   │   └── records-page.php
│   └── assets/
│       ├── css/
│       └── js/
│
├── public/
│   └── assets/
│       ├── css/
│       └── js/
│
├── languages/
│
├── uninstall.php
│
└── readme.txt
Each component should have a clearly defined responsibility.
- The database class manages table creation and database access.
- The records class handles insert, update, delete, and retrieval operations.
- The admin class manages dashboard pages and administrative actions.
- The frontend class handles public-facing functionality.
- The migrations class manages database schema upgrades.
This architecture makes the plugin easier to debug, extend, test, and maintain.
It also makes future development more efficient because database logic is separated from presentation and user-interface code.
Conclusion
Creating a WordPress plugin with a custom database table is a useful technique when your plugin needs to store structured information that does not fit naturally into WordPress posts, metadata, or options.
The recommended approach is to use $wpdb->prefix for table naming, $wpdb->get_charset_collate() for database compatibility, and dbDelta() for creating and modifying the table structure. Register an activation hook to initialize the database, maintain a schema version for upgrades, and use WordPress database methods for inserting, retrieving, updating, and deleting records.
Security should remain a priority throughout development. Validate and sanitize incoming data, use nonces for request verification, check user capabilities before administrative operations, and escape database values when displaying them.
Finally, plan your uninstall behavior carefully and test database migrations before releasing plugin updates.
With a well-designed database structure and a maintainable plugin architecture, developers can build reliable WordPress plugins for analytics, bookings, subscriptions, reporting, inventory management, custom forms, and many other applications.
For businesses and website owners who need specialized functionality, a professionally developed custom WordPress plugin can provide a database architecture and user experience tailored to their requirements.