Security is an essential part of professional WordPress plugin development. Whether you are creating a settings page, custom post type, dashboard widget, reporting system, user management tool, or administrative functionality, you must ensure that only authorized users can access sensitive features.
WordPress provides a built-in permission management system that allows developers to control what different users can do on a website. This system uses roles and capabilities to determine whether a user is authorized to perform a particular action.
For example, a website administrator may have permission to configure plugin settings, while an editor may only be allowed to manage content. A subscriber should not automatically gain access to administrative features simply because they are logged into WordPress.
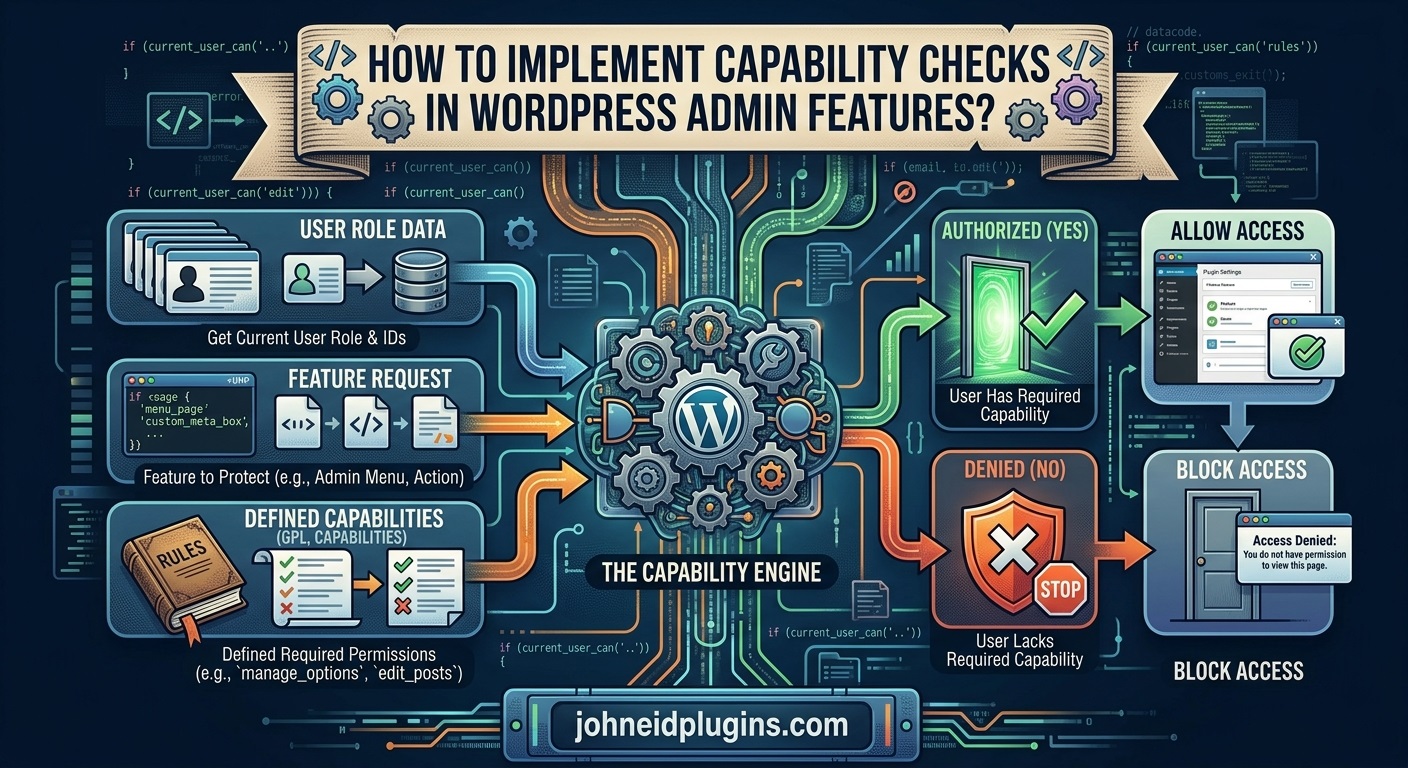
Capability checks help enforce these restrictions and protect important plugin functionality from unauthorized access.
However, implementing permission checks correctly requires more than hiding dashboard menu items. Developers must verify permissions when processing form submissions, saving settings, deleting records, handling AJAX requests, executing REST API operations, and performing other sensitive actions.
In this comprehensive guide, we will explain how to implement capability checks in WordPress admin features using practical PHP examples, built-in WordPress functions, security recommendations, and common troubleshooting techniques.
1. Understand WordPress Roles and Capabilities
Before implementing capability checks, it is important to understand the difference between WordPress roles and capabilities.
Roles represent predefined groups of permissions assigned to users.
Capabilities represent individual permissions that determine whether a user can perform a specific operation.
For example, WordPress includes several default roles:
- Administrator
- Editor
- Author
- Contributor
- Subscriber
Each role has a collection of capabilities.
An administrator generally has extensive website management permissions, while an editor can manage content but does not automatically have access to every administrative operation.
Some common WordPress capabilities include:
| Capability | Purpose |
|---|---|
manage_options | Manage general website options. |
edit_posts | Edit posts. |
publish_posts | Publish posts. |
delete_posts | Delete posts. |
upload_files | Upload media files. |
edit_pages | Edit pages. |
manage_categories | Manage categories. |
list_users | View the list of users. |
create_users | Create user accounts. |
manage_categories | Manage taxonomy categories. |
A critical development principle is to check capabilities rather than hardcoding role names.
For example, checking whether someone has the administrator role is generally less flexible than checking whether the user has the capability required for the operation.
A custom role might legitimately have permission to manage your plugin without being a full administrator.
You can learn more about WordPress roles and capabilities.
2. Understand the current_user_can() Function
WordPress provides the current_user_can() function to determine whether the currently logged-in user has a particular capability.
Its basic syntax is:
current_user_can( $capability, ...$args );The function returns:
trueif the current user has the required capability.falseif the current user does not have the required capability.
For example:
if ( current_user_can( 'manage_options' ) ) {

    echo 'You can manage website settings.';

} else {

    echo 'You do not have permission to access this feature.';
}
This example checks whether the current user can manage WordPress options.
If the user does not have the required capability, the restricted functionality should not be executed.
A capability check should be performed on the server side. Hiding an interface element with CSS or JavaScript is not sufficient because users may still attempt to access the underlying functionality directly.
The current_user_can() function is one of the most important tools for implementing permission checks in WordPress plugins.
Read the official current_user_can() documentation for additional information.
3. Restrict WordPress Plugin Administration Pages
Many WordPress plugins provide their own administration pages.
For example, a plugin might include:
- General settings.
- Email configuration.
- API integration.
- License management.
- Reports and analytics.
- Database maintenance.
- Import and export tools.
These pages should only be accessible to users who have the appropriate permissions.
WordPress provides functions such as add_menu_page() and add_submenu_page() for registering administration pages.
Both functions accept a capability argument that determines which users can access the page.
Consider this example:
function myplugin_add_admin_menu() {

    add_menu_page(
        'My Plugin Settings',
        'My Plugin',
        'manage_options',
        'myplugin-settings',
        'myplugin_settings_page',
        'dashicons-admin-generic',
        80
    );
}

add_action(
    'admin_menu',
    'myplugin_add_admin_menu'
);
The third argument is:
'manage_options'This means that users must have the manage_options capability to access the administration page.
WordPress automatically handles the menu visibility and access restrictions associated with this capability.
However, you should also protect the callback that renders the administration page.
For example:
function myplugin_settings_page() {

    if ( ! current_user_can( 'manage_options' ) ) {

        wp_die(
            esc_html__(
                'You are not allowed to access this page.',
                'myplugin'
            )
        );
    }

    echo '<div class="wrap">';
    echo '<h1>My Plugin Settings</h1>';
    echo '</div>';
}
This provides an additional server-side permission check before displaying sensitive content.
Using both menu-level capability restrictions and callback-level checks makes your plugin’s administrative interface more secure and easier to maintain.
4. Choose the Correct Capability for Each Administrative Feature
One of the most important decisions in plugin development is selecting the appropriate capability for each feature.
Using manage_options everywhere may seem convenient, but it can unnecessarily restrict functionality to administrators.
For example, consider a plugin that manages custom business records. You might want editors to view records, authorized managers to edit them, and administrators to configure plugin settings.
A better permission structure could look like this:
| Plugin functionality | Suggested capability |
|---|---|
| View plugin dashboard | read or custom capability |
| View records | edit_posts or custom capability |
| Create records | Custom capability |
| Edit records | Custom capability |
| Delete records | Custom capability |
| Export records | Custom capability |
| Configure plugin settings | manage_options |
| Manage plugin permissions | manage_options |
The correct capability depends on the nature of the feature and the website’s permission requirements.
Avoid granting broad permissions when a narrower capability is sufficient.
For example, a user who needs to export booking records should not necessarily receive permission to install plugins, change themes, or modify general WordPress settings.
A good permission system follows the principle of least privilege: users should receive only the permissions necessary to perform their assigned responsibilities.
5. Protect Plugin Settings Forms with Capability Checks
A common mistake among plugin developers is checking permissions when displaying a settings page but forgetting to verify permissions when saving its data.
A user might not see the settings page in the dashboard, but a poorly protected form-processing endpoint could still allow unauthorized changes.
Always perform capability checks before processing sensitive settings submissions.
Consider this example:
function myplugin_save_settings() {

    if ( ! current_user_can( 'manage_options' ) ) {
        wp_die( 'Permission denied.' );
    }

    if ( ! isset( $_POST['myplugin_nonce'] ) ) {
        wp_die( 'Invalid request.' );
    }

    check_admin_referer(
        'myplugin_save_settings',
        'myplugin_nonce'
    );

    $value = isset( $_POST['myplugin_title'] )
        ? sanitize_text_field(
            wp_unslash( $_POST['myplugin_title'] )
        )
        : '';

    update_option(
        'myplugin_title',
        $value
    );
}
In this example, the function checks the user’s capability before saving the setting.
It also verifies a security nonce and sanitizes the submitted value.
The nonce field can be generated in the settings form:
wp_nonce_field(
    'myplugin_save_settings',
    'myplugin_nonce'
);
There are two important security concepts here:
- Capability checks: Determine whether the current user is authorized to perform an operation.
- Nonce verification: Helps protect against cross-site request forgery (CSRF).
A nonce does not grant permission to perform an operation. Similarly, having the correct capability does not automatically protect a request against CSRF.
Use both where appropriate.
For more information, read the official WordPress Nonces documentation and WordPress data sanitization guide.
6. Implement Capability Checks in the WordPress Settings API
The WordPress Settings API provides a structured way to register plugin settings, create settings sections, and display administrative fields.
It also supports permission checks when saving settings.
For example:
function myplugin_register_settings() {

    register_setting(
        'myplugin_settings_group',
        'myplugin_settings',
        array(
            'sanitize_callback' => 'myplugin_sanitize_settings',
        )
    );
}

add_action(
    'admin_init',
    'myplugin_register_settings'
);
You can register an administration page using:
add_options_page(
    'My Plugin Settings',
    'My Plugin',
    'manage_options',
    'myplugin-settings',
    'myplugin_settings_page'
);
The Settings API normally uses the manage_options capability for settings operations.
If your plugin intentionally allows another capability to manage its settings, WordPress provides the option_page_capability_{$option_group} filter.
For example:
function myplugin_settings_capability( $capability ) {

    return 'edit_posts';
}

add_filter(
    'option_page_capability_myplugin_settings_group',
    'myplugin_settings_capability'
);
This changes the required capability for the specified settings group.
However, changing the Settings API permission does not automatically protect every custom action or page callback associated with your plugin.
You must ensure that the page, settings form, and any additional processing endpoints use a consistent authorization policy.
Do not lower the required capability simply to make a settings page accessible to more users. Evaluate whether those users should genuinely be allowed to modify the stored configuration.
Explore the official WordPress Settings API documentation for more information.
7. Protect AJAX Requests with Capability Checks
Many modern WordPress plugins use AJAX to perform operations without reloading the entire administration page.
Common examples include:
- Saving plugin settings.
- Deleting records.
- Updating dashboard statistics.
- Importing information.
- Exporting reports.
- Changing configuration options.
- Managing custom plugin data.
WordPress provides the wp_ajax_{$action} hook for handling AJAX requests from authenticated users.
Consider this example:
add_action(
    'wp_ajax_myplugin_save_data',
    'myplugin_save_ajax_data'
);

function myplugin_save_ajax_data() {

    if ( ! current_user_can( 'manage_options' ) ) {

        wp_send_json_error(
            array(
                'message' => 'You are not allowed to perform this action.',
            ),
            403
        );
    }

    check_ajax_referer(
        'myplugin_ajax_nonce',
        'nonce'
    );

    $value = isset( $_POST['value'] )
        ? sanitize_text_field(
            wp_unslash( $_POST['value'] )
        )
        : '';

    update_option(
        'myplugin_ajax_value',
        $value
    );

    wp_send_json_success(
        array(
            'message' => 'Settings saved successfully.',
        )
    );
}
This example performs three important operations:
- Checks the current user’s capability.
- Verifies the AJAX nonce.
- Sanitizes the submitted value before saving it.
The response is returned using wp_send_json_success() or wp_send_json_error().
If your AJAX feature is intended only for logged-in administrators, register it using wp_ajax_{$action} rather than the unauthenticated wp_ajax_nopriv_{$action} hook.
For public-facing AJAX functionality, unauthenticated requests may be necessary, but they require an appropriate security design. A capability check alone cannot authorize anonymous visitors because they do not have a logged-in WordPress user.
Read the official WordPress AJAX documentation for implementation details.
8. Implement Capability Checks in Custom REST API Endpoints
WordPress plugins increasingly use REST API endpoints to communicate between the administration dashboard and server-side PHP functionality.
For example, a plugin might use REST API requests to:
- Retrieve dashboard information.
- Update plugin settings.
- Create custom records.
- Delete database entries.
- Manage booking information.
- Generate reports.
When creating a custom REST API endpoint, WordPress provides the permission_callback parameter.
This callback determines whether a request is authorized before the main endpoint callback executes.
Example:
add_action(
    'rest_api_init',
    function () {

        register_rest_route(
            'myplugin/v1',
            '/settings',
            array(
                'methods'  => 'POST',
                'callback' => 'myplugin_update_settings',

                'permission_callback' => function () {

                    return current_user_can(
                        'manage_options'
                    );
                },
            )
        );
    }
);
The actual processing function might look like this:
function myplugin_update_settings( $request ) {

    $value = sanitize_text_field(
        $request->get_param( 'value' )
    );

    update_option(
        'myplugin_rest_setting',
        $value
    );

    return rest_ensure_response(
        array(
            'success' => true,
            'message' => 'Settings updated.',
        )
    );
}
The important point is that authorization occurs in the permission callback before the endpoint processes the request.
For more complex endpoints, you can return a WP_Error object with an appropriate HTTP status code when access is denied.
For example:
'permission_callback' => function () {

    if ( ! current_user_can( 'manage_options' ) ) {

        return new WP_Error(
            'myplugin_forbidden',
            'You are not allowed to access this resource.',
            array(
                'status' => 403,
            )
        );
    }

    return true;
},
Do not use an empty permission callback simply to suppress REST API warnings.
Every custom endpoint should have an intentional authorization policy.
You can learn more from the official WordPress REST API custom endpoints guide.
9. Use Object-Specific Capabilities for Custom Post Types
Sometimes a plugin manages individual records rather than general website settings.
For example, a property management plugin might allow users to edit their own properties but prevent them from editing properties belonging to other users.
In such cases, checking a general capability like edit_posts may not provide sufficient protection.
WordPress supports meta capabilities that evaluate permissions against individual objects.
Some important examples include:
edit_postdelete_postread_postedit_post_metadelete_post_meta
For example:
$post_id = 125;

if ( current_user_can( 'edit_post', $post_id ) ) {

    // Allow editing this specific post.

} else {

    wp_die(
        'You cannot edit this record.'
    );
}
WordPress maps the object-specific capability to the appropriate primitive capabilities based on the current user and the target object.
This allows WordPress to consider ownership, publication status, post type, and other relevant conditions.
For custom post types, you should configure the capability mapping when registering the post type.
Example:
register_post_type(
    'property',
    array(
        'label' => 'Properties',

        'public' => true,

        'capability_type' => array(
            'property',
            'properties',
        ),

        'map_meta_cap' => true,
    )
);
This tells WordPress to generate capabilities for the custom post type and map meta capabilities appropriately.
For more information, consult the register_post_type() documentation and the WordPress capability mapping documentation.
Important: Registering custom capability types does not automatically grant those capabilities to every role. You must assign the required permissions separately.
10. Create Custom Capabilities for Your Plugin
Sometimes WordPress’s default capabilities are not suitable for your plugin.
For example, a booking management plugin might need separate permissions for:
- Viewing bookings.
- Creating bookings.
- Editing bookings.
- Deleting bookings.
- Exporting booking reports.
- Managing booking settings.
Using manage_options for every operation would give administrators complete control while preventing other authorized users from accessing individual features.
A better approach is to create custom capabilities.
For example:
function myplugin_add_custom_capabilities() {

    $role = get_role( 'administrator' );

    if ( ! $role ) {
        return;
    }

    $role->add_cap( 'myplugin_view_bookings' );

    $role->add_cap( 'myplugin_create_bookings' );

    $role->add_cap( 'myplugin_edit_bookings' );

    $role->add_cap( 'myplugin_delete_bookings' );

    $role->add_cap( 'myplugin_export_reports' );
}
Register this function during plugin activation:
register_activation_hook(
    __FILE__,
    'myplugin_add_custom_capabilities'
);
Now you can check these capabilities individually:
if ( current_user_can( 'myplugin_view_bookings' ) ) {

    // Display booking information.
}
For deleting records:
if ( current_user_can( 'myplugin_delete_bookings' ) ) {

    // Allow the deletion operation.
}
This approach creates a more flexible permission system.
For example, you could grant booking managers permission to view and edit bookings without giving them permission to delete records or change plugin settings.
Custom capabilities are particularly useful for complex plugins, business management systems, membership applications, and multi-user administration tools.
11. Assign Custom Capabilities to Multiple Roles
After creating custom capabilities, you may want to assign them to additional WordPress roles.
For example, booking managers and administrators may need permission to manage bookings, while editors may only need read-only access.
You can assign capabilities to existing roles using get_role() and add_cap().
Example:
function myplugin_assign_role_capabilities() {

    $role_permissions = array(

        'administrator' => array(
            'myplugin_view_bookings',
            'myplugin_create_bookings',
            'myplugin_edit_bookings',
            'myplugin_delete_bookings',
            'myplugin_export_reports',
        ),

        'editor' => array(
            'myplugin_view_bookings',
        ),
    );

    foreach ( $role_permissions as $role_name => $capabilities ) {

        $role = get_role( $role_name );

        if ( ! $role ) {
            continue;
        }

        foreach ( $capabilities as $capability ) {

            $role->add_cap( $capability );
        }
    }
}
You can execute this function during plugin activation.
The advantage is that permissions are assigned centrally instead of being scattered throughout your plugin code.
However, be careful when changing existing roles.
Adding capabilities to the editor role should be based on a clear requirement. Editors may be trusted to manage content, but that does not automatically mean they should have access to customer records, financial reports, or sensitive business settings.
Also consider how role changes should be handled during plugin upgrades.
12. Protect Delete, Import, Export, and Other Sensitive Operations
Some plugin features perform actions that can significantly affect website data.
Examples include:
- Deleting database records.
- Importing CSV files.
- Exporting customer information.
- Resetting plugin settings.
- Clearing plugin tables.
- Performing bulk updates.
- Removing uploaded files.
These operations should have specific capability checks.
For example, a delete operation could use:
function myplugin_delete_record( $record_id ) {

    if ( ! current_user_can( 'myplugin_delete_bookings' ) ) {

        return new WP_Error(
            'permission_denied',
            'You cannot delete this record.'
        );
    }

    $record_id = absint( $record_id );

    if ( ! $record_id ) {
        return new WP_Error(
            'invalid_record',
            'Invalid record ID.'
        );
    }

    // Perform the validated deletion operation.
}
Notice that the function checks permissions before performing the sensitive operation.
For file imports and exports, you should also validate file types, verify upload permissions, and protect sensitive information.
A user who can view booking information should not automatically be allowed to export an entire customer database.
The same principle applies to database reset buttons and destructive maintenance operations.
Always use the narrowest appropriate capability.
13. Distinguish Authentication, Authorization, and Nonce Verification
These three concepts are related but perform different security functions.
| Security concept | Main purpose |
|---|---|
| Authentication | Establishes who the user is. |
| Authorization | Determines what the user is allowed to do. |
| Nonce verification | Helps protect requests against CSRF attacks. |
For example, a user may be authenticated because they are logged into WordPress.
However, being logged in does not mean they are authorized to change plugin settings.
Similarly, a valid nonce does not prove that the user has permission to delete a database record.
A secure plugin should combine these mechanisms appropriately.
For an administrative action, the general process should be:
- Confirm that the request is being handled in the expected WordPress context.
- Check the user’s required capability.
- Verify the request nonce where CSRF protection is needed.
- Validate submitted parameters.
- Sanitize data before storage.
- Execute the authorized operation.
- Return a suitable response.
For additional guidance, explore the WordPress security handbook.
14. Handle Capability Checks in Multisite WordPress
WordPress Multisite introduces additional permission considerations because users may have different capabilities across individual websites within the same network.
For example, a user might be an administrator on one website but only an editor on another.
If your plugin supports Multisite, you should consider whether its administrative functionality operates at the individual website level or across the entire network.
For individual website permissions, WordPress provides:
current_user_can( 'manage_options' );For checking capabilities on a specific website in the network, you can use:
current_user_can_for_blog(
    $blog_id,
    'manage_options'
);
For network-level administration, capabilities such as manage_network_options may be appropriate.
For example:
if ( current_user_can( 'manage_network_options' ) ) {

    // Allow network-level configuration.

}
Do not assume that an administrator of an individual website automatically has network administration permissions.
Likewise, avoid granting network-level capabilities when a plugin only needs to manage settings for an individual website.
You can learn more about WordPress Multisite roles and capabilities.
15. Test Capability Restrictions with Different User Accounts
Testing is essential when developing a plugin with administrative features.
A capability check may appear correct when you test using an administrator account, but problems can emerge when other user roles access the same functionality.
Create test accounts representing different permission levels.
For example:
| User role | Expected plugin access |
|---|---|
| Administrator | Full plugin management |
| Editor | View and manage permitted records |
| Author | Access only specifically authorized features |
| Contributor | Limited content-related access |
| Subscriber | No restricted administrative access |
| Custom Manager | Access features assigned through custom capabilities |
Test the following scenarios:
Direct administration URL: Try opening a restricted plugin page directly rather than accessing it through the dashboard menu.
Form submission: Attempt to submit a settings form using an account without the required capability.
AJAX requests: Test whether unauthorized users can execute restricted AJAX actions.
REST API requests: Attempt to access protected endpoints with accounts that lack the required permissions.
Record management: Verify that users cannot edit or delete records they are not authorized to manage.
Role changes: Remove a capability from a test account and confirm that access is denied immediately.
You can also use browser developer tools to inspect failed AJAX and REST API requests.
For larger plugins, consider writing automated tests for permission-sensitive functionality using the WordPress PHPUnit testing framework.
Testing with multiple accounts helps identify authorization problems before your plugin reaches production websites.
16. Common Mistakes When Implementing WordPress Capability Checks
Even experienced WordPress developers can make mistakes when implementing access control.
Here are some common problems to avoid.
Checking role names instead of capabilities
Avoid writing code that checks whether a user has the administrator role.
Instead, use current_user_can() with the capability required for the operation. This allows custom roles to receive the same functionality without being assigned an administrator role.
Hiding menu items without protecting callbacks
Removing an administration menu item does not secure the underlying functionality.
Always protect the page callback and processing endpoints.
Forgetting AJAX permission checks
A restricted dashboard button does not automatically protect its AJAX action. Check capabilities inside the server-side AJAX handler.
Using nonces as permission checks
A nonce is not an authorization mechanism. Always perform a separate capability check.
Using excessive permissions
Requiring manage_options for every plugin feature can unnecessarily restrict legitimate users.
Use custom capabilities when your plugin requires more detailed access control.
Forgetting REST API permissions
Every custom REST API endpoint should have an appropriate permission_callback.
Checking permissions after performing an operation
Capability checks must occur before the sensitive operation is executed.
Ignoring object-specific permissions
When managing individual records, use meta capabilities such as edit_post and delete_post with the relevant object ID where applicable.
Granting capabilities permanently without considering deactivation
If your plugin creates custom capabilities, consider removing them during deactivation or uninstall according to your data-retention and reactivation strategy.
Testing only with administrator accounts
Always test with users who have different capabilities, including custom roles.
17. Best Practices for Building a Secure WordPress Permission System
A well-designed permission system should be easy to understand, maintain, and extend.
Consider following these development practices:
- Use
current_user_can()for server-side authorization. - Prefer capabilities over hardcoded role-name checks.
- Assign separate capabilities to different plugin operations.
- Protect administration page callbacks.
- Verify permissions before saving settings.
- Protect AJAX handlers with capability checks.
- Add
permission_callbackto REST API endpoints. - Use object-specific capabilities for individual records.
- Combine authorization checks with nonce verification where appropriate.
- Validate and sanitize incoming data.
- Escape dynamic output.
- Apply the principle of least privilege.
- Test custom roles and Multisite configurations.
- Document permission requirements for administrators.
- Review permissions whenever new plugin features are introduced.
You should also centralize repeated permission checks in reusable functions when developing larger plugins.
For example:
function myplugin_user_can_manage_bookings() {

    return current_user_can(
        'myplugin_manage_bookings'
    );
}
You can then reuse this function in multiple plugin components.
if ( ! myplugin_user_can_manage_bookings() ) {

    wp_die(
        'You do not have permission to manage bookings.'
    );
}
This reduces duplicated permission logic and makes future changes easier.
For particularly complex plugins, consider implementing a dedicated permissions class that manages capability names and authorization decisions.
Final Checklist for Implementing Capability Checks
Before releasing your WordPress plugin, review the following checklist:
- Identify all administrative features that require access restrictions.
- Select appropriate capabilities for each feature.
- Use
current_user_can()for permission checks. - Restrict administration menu pages.
- Protect page rendering callbacks.
- Protect settings submission handlers.
- Verify permissions in AJAX requests.
- Implement REST API permission callbacks.
- Use object-specific capabilities when necessary.
- Create custom capabilities for specialized functionality.
- Assign capabilities to the appropriate roles.
- Verify nonces for relevant state-changing requests.
- Validate and sanitize submitted data.
- Protect destructive operations.
- Consider Multisite compatibility.
- Test administrator, editor, subscriber, and custom accounts.
- Document the plugin’s permission requirements.
Following this checklist can help prevent unauthorized access and improve the overall security of your plugin.
Conclusion
Capability checks are a fundamental part of secure WordPress plugin development. They allow developers to control access to administrative pages, settings, database operations, AJAX handlers, REST API endpoints, and other sensitive functionality.
WordPress provides a flexible permission system through roles and capabilities, making it possible to implement access restrictions without creating an entirely separate authorization framework.
The current_user_can() function is particularly important because it allows developers to verify whether the current user has permission to perform a specific operation.
For more advanced plugins, custom capabilities provide additional flexibility by separating permissions for viewing, creating, editing, deleting, exporting, and managing records.
However, hiding dashboard menus or checking whether a user is logged in is not sufficient. Every sensitive server-side operation must enforce its own authorization requirements.
By combining capability checks, nonce verification, input validation, sanitization, and appropriate permission mapping, developers can build WordPress plugins that are more secure, maintainable, and suitable for websites with multiple users.
Whether you are developing a simple settings plugin, a custom dashboard, a booking management system, or a complex business application, implementing capability checks correctly should be part of your development process from the beginning.